/// <summary>
/// 16진수 문자열을 byte array로 변환
/// </summary>
/// <param name="HexString"></param>
/// <returns></returns>
public byte[] HexStringToByteArray(string HexString)
{
    // 0x, 0X를 제거
    if (HexString.StartsWith("0x") || HexString.StartsWith("0X")) HexString = HexString.Substring(2);

    // hex character가 아닌 문자가 포함되어 있으면 해당 character를 제거
    HexString = new string(HexString.Where(c => Uri.IsHexDigit(c)).ToArray());

    // hex string을 byte array로 변환하기
    string hexString = HexString.Replace(" ", ""); // 공백 제거
    if (hexString.Length % 2 != 0)
    {
        hexString = "0" + hexString; // hex string의 길이가 홀수이면 앞에 0을 추가
        // return null;
    }

    byte[] bytes = new byte[hexString.Length / 2]; // byte array의 크기는 hex string의 길이의 절반
    for (int i = 0; i < hexString.Length; i += 2)
    {
        bytes[i / 2] = Convert.ToByte(hexString.Substring(i, 2), 16); // 16진수 문자열을 byte로 변환
    }

    return bytes;
}

/// <summary>
/// 2진수 문자열을 byte array로 변환
/// </summary>
/// <param name="BinaryString"></param>
/// <returns></returns>
public byte[] BinaryStringToByteArray(string BinaryString)
{
    // 0b, 0B를 제거
    if (BinaryString.StartsWith("0b") || BinaryString.StartsWith("0B")) BinaryString = BinaryString.Substring(2);

    // binary character가 아닌 문자가 포함되어 있으면 해당 character를 제거
    BinaryString = new string(BinaryString.Where(c => c == '0' || c == '1').ToArray());

    // binary string을 byte array로 변환하기
    string binaryString = BinaryString.Replace(" ", ""); // 공백 제거
    if (binaryString.Length % 8 != 0)
    {
        //binary string의 길이가 8의 배수가 아니면 8의 배수가되게 0을 추가
        binaryString = binaryString.PadLeft(binaryString.Length + (8 - binaryString.Length % 8), '0');
    }

    byte[] bytes = new byte[binaryString.Length / 8]; // byte array의 크기는 binary string의 길이의 8분의 1
    for (int i = 0; i < binaryString.Length; i += 8)
    {
        bytes[i / 8] = Convert.ToByte(binaryString.Substring(i, 8), 2); // 2진수 문자열을 byte로 변환
    }

    return bytes;
}

/// <summary>
/// 2진수(0b01), Decimal, 16진수(0x01) 문자열을 int형으로 변환
/// </summary>
/// <param name="NumberString"></param>
/// <returns></returns>
public int StringToInt32(string NumberString)
{
    if (NumberString == null) return 0;

    int result = 0;
    if (NumberString.StartsWith("0b") || NumberString.StartsWith("0B"))
    {
        byte[] bytes = BinaryStringToByteArray(NumberString); // 2진수 문자열을 byte array로 변환
        Array.Reverse(bytes); // byte array를 reverse

        if (bytes != null) result = BitConverter.ToInt32(bytes, 0); // byte array를 int로 변환
    }
    else if (NumberString.StartsWith("0x") || NumberString.StartsWith("0X"))
    {
        byte[] bytes = HexStringToByteArray(NumberString); // 16진수 문자열을 byte array로 변환
        Array.Reverse(bytes); // byte array를 reverse

        if (bytes != null) result = BitConverter.ToInt32(bytes, 0); // byte array를 int로 변환
    }
    else
    {
        //숫자를 제외한 문자열 삭제
        NumberString = new string(NumberString.Where(c => char.IsDigit(c) || c == '-').ToArray());

        //하위 10개 문자열만 제외하고 삭제
        if (NumberString.Length > 11) NumberString = NumberString.Substring(NumberString.Length - 11, 11);

        //int형을 벗어나는 값이면 최대값 또는 최소값으로 설정
        Int64 tmpNum = Convert.ToInt64(NumberString);
        if (tmpNum > int.MaxValue) result = int.MaxValue;
        else if (tmpNum < int.MinValue) result = int.MinValue;
        else result = Convert.ToInt32(NumberString);

    }

    return result;
}

'Programming > C#' 카테고리의 다른 글

텍스트 박스에 HEX만 입력 필터링  (0) 2020.12.04

0. 기본 폴더 : /home/docker/vuejs/front/


1. default.conf - 기본폴더/nginx/default.conf

vue.js router 사용하기 위한 설정

server {  
  listen 80;  
  listen \[::\]:80;  

  root /usr/share/nginx/html;  

  index index.html;  

  server\_name vue-router.example.com;  

  location / {  
    try\_files $uri $uri/ @rewrites;  
  }  

  location @rewrites {  
    rewrite ^(.+)$ /index.html last;  
  }  

  location ~\* \\.(?:ico|css|js|gif|jpe?g|png)$ {  
    expires max;  
    add\_header Pragma public;  
    add\_header Cache-Control "public, must-revalidate, proxy-revalidate";  
  }  
}


2. vue.js build

dist 배포 디렉토리가 생성됨

npm run build


3. docker 실행

배포 디렉토리 및 nginx 설정파일을 nginx docker 와 연결

docker run --name vuejs_server -d -p 80:80 -v /home/docker/vuejs/front/dist:/usr/share/nginx/html -v /home/docker/vuejs/front/nginx:/etc/nginx/conf.d nginx

defualt.conf - nginx 설정파일

server {

  listen 80;
  listen [::]:80;

  root /usr/share/nginx/html;

  index index.html;

  server_name vue-router.example.com;

  location / {
    try_files $uri $uri/ @rewrites;
  }

  location @rewrites {
    rewrite ^(.+)$ /index.html last;
  }

  location ~* \.(?:ico|css|js|gif|jpe?g|png)$ {
    expires max;
    add_header Pragma public;
    add_header Cache-Control "public, must-revalidate, proxy-revalidate";
  }

}

Dockerfile - docker build 파일

#Docker file for VueJS using NGINX

\# build stage
FROM node:lts-alpine as build-stage
WORKDIR /app
COPY package\*.json ./
RUN npm install
COPY . .
RUN npm run build

\# production stage
FROM nginx:stable-alpine as production-stage
COPY \--from\=build-stage /app/dist /usr/share/nginx/html
RUN rm /etc/nginx/conf.d/default.conf
COPY \--from\=build-stage /app/default.conf /etc/nginx/conf.d/
EXPOSE 80
CMD \["nginx", "-g", "daemon off;"\]

docker build -t vuejs .
docker run --name vuejs_server -d -p 80:80 vuejs

private void textBox_KeyPress(object sender, KeyPressEventArgs e)
{
  /* HEX만 입력 되도록 필터링 */
  if (!(char.IsDigit(e.KeyChar) || e.KeyChar == Convert.ToChar(Keys.Back) || 
        "ABCDEF0123456789abcdef".IndexOf(e.KeyChar) != -1)) /* 숫자와 백스페이스를 제외한 나머지를 바로 처리 */
  {
    e.Handled = true;
  }
}
/// <summary>
/// character가 hex characters, spaces, backspace, and delete 이면 true를 반환
/// </summary>
/// <param name="c"></param>
/// <returns></returns>
public bool IsHexDigit(char c)
{
    return Uri.IsHexDigit(c) || c == ' ' || c == '\b' || c == '\u007F' || c == '\u0016' || c == '\u0003';
}

'Programming > C#' 카테고리의 다른 글

Binary, Decimal, Hex 문자열을 숫자로 변환  (0) 2023.08.28

1. 클럭설정

- TIM2 사용을 위해 APB1 Timer clocks 설정 - 72MHz

2. TIM2 설정

- Clock Source : Internal Clock

- Prescaler : 7200-1

- Counter Period : 10000-1

계산식 : 72MHz / 7200 / 10000 = 1

3. 코드

- 프로젝트 생성 후 htim2 타이머 인터럽트 시작 추가

- 정의된 HAL_TIM_PeriodElapsedCallback 사용 LED 토글

int main(void)
{
  /* USER CODE BEGIN 1 */

  /* USER CODE END 1 */

  /* MCU Configuration--------------------------------------------------------*/

  /* Reset of all peripherals, Initializes the Flash interface and the Systick. */
  HAL_Init();

  /* USER CODE BEGIN Init */

  /* USER CODE END Init */

  /* Configure the system clock */
  SystemClock_Config();

  /* USER CODE BEGIN SysInit */

  /* USER CODE END SysInit */

  /* Initialize all configured peripherals */
  MX_GPIO_Init();
  MX_TIM2_Init();
  /* USER CODE BEGIN 2 */
  HAL_TIM_Base_Start_IT(&htim2);

  /* USER CODE END 2 */

  /* Infinite loop */
  /* USER CODE BEGIN WHILE */
  while (1)
  {
    /* USER CODE END WHILE */

    /* USER CODE BEGIN 3 */
  }
  /* USER CODE END 3 */
}

void HAL_TIM_PeriodElapsedCallback(TIM_HandleTypeDef *htim)
{
  if (htim->Instance == TIM2) /* 1s */
  {
    HAL_GPIO_TogglePin(LD2_GPIO_Port, LD2_Pin);
  }
}

1. gitlab 디렉토리 생성


mkdir gitlab


2. gitlab docker 이미지 설치

hostname과 volume은 수정해야함. 이미지 버전은 백업된 gitlab의 버전과 동일하게 할 것.

이미지 버전은 아래 사이트에서 확인

hub.docker.com/r/gitlab/gitlab-ee/tags


Docker Hub


hub.docker.com

sudo docker run --detach \
  --hostname test.duwon.net\
  --publish 443:443 --publish 80:80 --publish 122:22 \
  --name gitlab \
  --restart always \
  --volume /home/duwon/gitlab/config:/etc/gitlab \
  --volume /home/duwon/gitlab/logs:/var/log/gitlab \
  --volume /home/duwon/gitlab/data:/var/opt/gitlab \
  gitlab/gitlab-ee:latest

3. 백업 이미지 /home/duwon/gitlab/data/backups에 복사


4. 복원


sudo docker exec -it gitlab gitlab-ctl stop unicorn
sudo docker exec -it gitlab gitlab-ctl stop puma
sudo docker exec -it gitlab gitlab-ctl stop sidekiq
sudo docker exec -it gitlab gitlab-backup restore BACKUP=1599528998_2020_09_08_13.3.5-ee

1599528998_2020_09_08_13.3.5-ee_gitlab_backup.tar 파일명에서 _gitlab_backup.tar앞까지만 입력


5. 재시작

sudo docker restart gitlab

'Linux' 카테고리의 다른 글

QNAP 공유폴더에 우분투 gitlab-ee 백업하기  (0) 2020.09.08
xinetd 설치하기  (0) 2007.03.27
부트로더 GRUB에서의 root 암호 변경  (0) 2007.03.13
하드디스크 추가하기  (0) 2007.03.05
minicom 설치  (0) 2006.08.11

1.  QNAP nfs 설정


2. 리눅스에서 QNAP 서버 마운트


sudo vi /etc/fstab


3. 자동 마운트를 위해 fstab 수정

192.168.2.32:/Gitlab /mnt/Gitlab nfs defaults 0 0


4. 마운트하기


sudo mount -a


5. gitlab 설정 파일 열기

sudo vi /etc/gitlab/gitlab.rb


6. gitlab.rb 수정

백업후 로컬폴더로 업로드 하지 않고 백업폴더를 마운트된 디렉토리로 지정해버림


gitlab_rails['manage_backup_path'] = true
gitlab_rails['backup_path'] = "/mnt/Gitlab"

gitlab_rails['manage_backup_path'] = true
gitlab_rails['backup_path'] = "/mnt/Gitlab"


백업 후 업로드 할 경우 아래 참조

docs.gitlab.com/ee/raketasks/backup_restore.html#uploading-to-locally-mounted-shares


Back up and restore GitLab | GitLab

Back up and restore GitLab GitLab provides Rake tasks for backing up and restoring GitLab instances. An application data backup creates an archive file that contains the database, all repositories and all attachments. You can only restore a backup to exact

docs.gitlab.com

7. 재설정

sudo gitlab-ctl reconfigure


8. 백업하기

sudo gitlab-backup create


설정파일은 백업되지 않음으로 수정백업 해야함.

'Linux' 카테고리의 다른 글

gitlab-ee 백업파일 docker로 간단하게 복원하기  (0) 2020.09.08
xinetd 설치하기  (0) 2007.03.27
부트로더 GRUB에서의 root 암호 변경  (0) 2007.03.13
하드디스크 추가하기  (0) 2007.03.05
minicom 설치  (0) 2006.08.11

1. https://www.raspberrypi.org/downloads/ 라즈비안 다운로드 및 설치

    - Raspberry Pi Imager for Windows 을 다운로드하여 설치

    - microsd 카드를 삽입 후 Raspberry Pi 프로그램을 실행

    - Raspberry PI OS 32bit 선택하고 SD카드 드라이버를 선택 후 Write

2. boot 폴더에 ssh 파일 생성

    - 라즈베리파이 OS 쓰기 완료 후 microsd 카드를 뺏다가 다시 삽입

    - 메모장을 열고 다른이름으로 저장

    - 파일형식은 모든 파일, 파일이름은 "ssh" 입력 후 microsd카드 boot 드라이브에 저장


3. boot 폴더에 wpa_supplicant.conf 파일 생성

    - 메모장에 아래와 같이 붙여놓고 ssid 및 psk 입력 후 저장

    - 라즈베리파이4 에서는 5G만 검색됨

ctrl_interface=DIR=/var/run/wpa_supplicant GROUP=netdev
update_config=1
network={
    ssid="접속할 WIFI 이름"
    psk="접속할 WIFI 암호"
}


4. 부팅 후 ssh  접속

    - 라즈베리파이에 microsd 카드 삽입 후 전원 연결

    - 윈도우의 파워쉘 실행하고 ssh pi@raspberrypi 입력

    - 연결이 안될경우 동일 wifi 네트웍에 연결되었는지 확인하여 라즈베리파이 IP 주소를 확인


    id : pi

    pw : raspberry


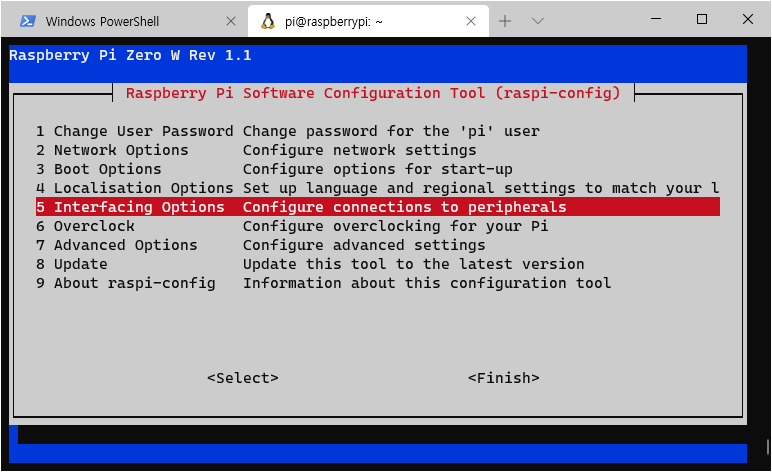
5. 라즈베리파이 설정


sudo raspi-config

    - 5번 인터페이스 설정에서 VNC 및 SPI 설정


6. VNC 접속

    https://www.realvnc.com/en/connect/download/viewer/ VNC 다운로드 및 설치

    - 라지베리파이 재부팅 후 VNC에 IP 주소 입력

    - 비밀번호 및 와이파이 설정

    - Raspberry PI Configration 메뉴에서 Display 탭의 Reso 

    - /boot/config.txt 수정이 필요 할 수 있음

hdmi_force_hotplug=1
hdmi_group=2
hdmi_mode=78
#해당도 설정
hdmi_cvt=1024 600 60 0 0 0


7. 나눔고딕 설치


sudo apt install fonts-nanum fonts-nanum-extra

1. https://pypi.org/project/setuptools 사이트 방문하여 Download files 메뉴를 선택하여 setuptools-xx.xx.zip 파일을 다운로드 한다.


2. 윈도우에 파이선이 설치되어 있다면 압축파일 내에 easy_install.py을 클릭하여 설치한다.


3. 환경변수에 현재 설치된 pip3의 실행파일 위치를 등록한다.

파이썬 3.8설치한 제 컴퓨터 기준 %APPDATA%\..\Local\Programs\Python\Python38-32\Scripts 

( C:\Users\1\AppData\Local\Programs\Python\Python38-32\Scripts )


4. 윈도우 파워쉘에서 pip3 install 명령어를 실행 할 수 있다.


윈도우10에서 환경변수 등록 방법


1. 윈도우10에서 검색 창을 열고(위도우 키를 누르고) '고급 시스템 설정 보기'을 실행한다.


2.  오른쪽 밑 환경변수 버튼을 클릭한다.

3. 사용자변수 Path을 찾아 더블클릭한다.


참조 사이트:
     1. 컴파일러 WinARM   http://www.siwawi.arubi.uni-kl.de/avr_projects/arm_projects/
     2. AT91-ISP(SAM-BA)    http://www.atmel.com/dyn/products/tools_card.asp?tool_id=3883

     3. Programmers Notepad   http://www.pnotepad.org/

다운로드:
     1. 컴파일러 WinARM-20070505   http://www.cpuplaza.co.kr/upload/bbs/WinARM-20070505_sfx.exe

     2. Program Note Pad(PN208718)   http://pnotepad.googlecode.com/files/pn208718.exe

     3. AT91-ISP(SAM-BA)   http://www.atmel.com/dyn/resources/prod_documents/Install%20AT91-ISP%20v1.13.exe


WinARM 설치

다운받은 WinARM 파일을 클릭하면 압축 풀 디렉토리를 설정하는 화면이 나온다. C:\ 라고 설정하면 C:\WinARM 디렉토리에 압축이 풀리게 된다.

    winarm1.png


압축이 모두 풀린 후 시스템 등록정보의 환경변수를 설정 해 줘야 한다. 윈도우+PauseBreak 버튼을 누르면 시스템 등록정보 창이 뜬다.

winarm2.png


환경변수를 클릭하면 아래으 창이 뜬다. 시스템 변수 란에 Path 를 찾아 편집 버튼을 누르자.

winarm3.png


Path 변수값 젤 뒤에 다음과 같이 적자 ;c:\WinARM\bin;c:\WinARM\utils\bin

winarm4.png


Programmer Note 설치

Programmer Note는 단지 메모장과 같은 역활을 할 뿐이다. 컴파일러와 연동하여 컴파일러를 통해 실행파일을 만들게 된다. Programmer Note는 무료이므로 사람들이 많이 사용하는 것이고, 다른 여러 프로그램이 많다. UltraEditor도 많이 사용 했던 것 같다.

Programmer Note를 클릭하여 설치 한 후 메뉴의 Tools>Options 선택하면 아래의 화면이 나온다.

pn1.png


Tools의 Scheme에서 C/C++ 선택하자. 처음 설치이기 때문에 ADD 버튼을 눌러 컴파일러을 연동 해 주자.

pn2.png


F9 와 F12 버튼을 단축키로 등록 한 것이다.

pn3.png


pn4.png


이로써 설치는 모두 끝났다 간단한 사용법을 통해 WinARM을 사용해 보자.

이 글은 스프링노트에서 작성되었습니다.

+ Recent posts